This garlic herb lobster tail recipe is all about the small, deliberate moments—like timing the infusion of herbs and garlic just right. It’s a technique that transforms what might seem like a straightforward shellfish dish into something fragrant and layered, almost like a little aromatic symphony in your hands. I love how a few careful steps can elevate lobster from simple to spectacular, especially when you want to impress without fussing too much.
There’s something deeply satisfying about controlling the aroma and tenderness of lobster with just a few ingredients and a gentle touch. It’s not about over-complicating; it’s about understanding when and how those herbal oils kiss the lobster meat, making each bite burst with bright, comforting flavor. This recipe is a reminder that sometimes, the smallest details make all the difference in a dish that feels fancy but is quite straightforward.
Focusing on the overlooked technique of infusing lobster tails with garlic and herbs at a precise moment, this recipe emphasizes how timing and method can transform a simple shellfish into a fragrant, tender centerpiece that balances richness with bright, herbal notes.
The story behind this recipe
I first came across this technique during a quiet summer evening by the coast, watching a chef work his magic with lobster. The way he infused the shellfish with herbs and garlic at just the right moment sparked an idea in me: that simple, focused infusions could really turn a meal into something memorable. Since then, I’ve played with timing and herbs, trying to find that sweet spot where flavors bloom and lobster stays tender. It’s become a go-to method whenever I want to elevate a special dinner without fussing over complicated sauces or techniques.
Ingredient Breakdown
- Garlic: I love slicing it thin so it crisps up a bit, releasing that pungent, toasted aroma—don’t skip this step.
- Fresh herbs (parsley, thyme): I toss these in just before the lobster finishes cooking, letting their bright, fragrant oils coat the meat.
- Lobster tail: I prefer to buy tails that feel firm and heavy, with shells that are glossy—freshness shows in the weight and shine.
- Butter: Go for unsalted, preferably European-style—its rich, creamy flavor melts beautifully and carries the herbs well.
- Lemon: I zest it first to get that bright, aromatic burst, then squeeze just before serving for maximum zing.
- Olive oil: A drizzle before roasting adds a subtle smoky richness, but keep it light so it doesn’t drown the lobster’s natural sweetness.
- Salt: I prefer sea salt flakes for that satisfying crunch and a burst of mineral brightness, just enough to enhance without masking.
Spotlight on key ingredients
Garlic and Herbs:
- Garlic: I slice it thin to release a pungent, toasted aroma—don’t skip this step, it crisps up beautifully.
- Fresh herbs (parsley, thyme): I add these just before the lobster finishes cooking, letting their oils coat the meat and brighten the flavor.
Lobster Tail:
- I look for firm, heavy shells with a glossy shine—freshness shows in the weight and color, and it responds beautifully to gentle roasting.
- The shell’s natural ridges and the slight sheen of moisture tell me it’s fresh, and the meat’s bounce confirms it’s plump and tender.
Notes for ingredient swaps
- Dairy-Free: Swap butter for coconut oil or a dairy-free butter alternative. You won’t get that creamy richness, but the flavor will stay bright and tropical.
- Herbs: If fresh herbs aren’t available, use dried, but cut the quantity in half. Dried herbs release their flavor more slowly and less vibrantly.
- Garlic: Roasted garlic can be used instead of raw minced, adding a milder, caramelized sweetness that mellows into the butter beautifully.
- Lobster: If lobster tails aren’t accessible, king crab legs or large shrimp can work—just adjust cooking times, and expect different textures.
- Lemon: Lime zest and juice make a good substitute, offering a slightly different tartness but still brightening the dish well.
- Olive Oil: Use avocado oil for a neutral, high-smoke-point alternative that won’t interfere with the herbal butter’s aroma.
- Sea Salt: Flaked sea salt adds crunch and mineral brightness—if unavailable, coarse kosher salt is a decent stand-in.
Equipment & Tools
- Sharp scissors or boning knife: Cut through shell cleanly and precisely.
- Baking sheet with rim: Hold lobster and catch drips during roasting.
- Small saucepan: Make and infuse the garlic herb butter.
- Basting brush: Apply butter evenly on lobster meat.
Step-by-step guide to lobster prep
- Equipment & Tools: Use a sharp kitchen scissors or boning knife to cut the lobster shell; a baking sheet with a rim; a basting brush for butter; and a small saucepan for infusion.
- Preheat your oven to 200°C (390°F). Line your baking sheet with foil or parchment for easy cleanup.
- Prepare the lobster tails: Using scissors, cut along the top shell from base to tip, stopping just before the tail fin. Gently pry open, keeping the shell intact; loosen the meat slightly for better infusion.
- Make the garlic herb butter: Melt 1/2 cup unsalted butter in the saucepan over low heat. Add 3 minced garlic cloves and a tablespoon each of chopped parsley and thyme. Simmer gently for 3 minutes until fragrant; don’t let garlic brown.
- Infuse the lobster: Place the lobster tails on the prepared baking sheet, meat side up. Brush generously with the garlic herb butter, reserving some for finishing. Tuck a few sprigs of thyme among the tails if desired.
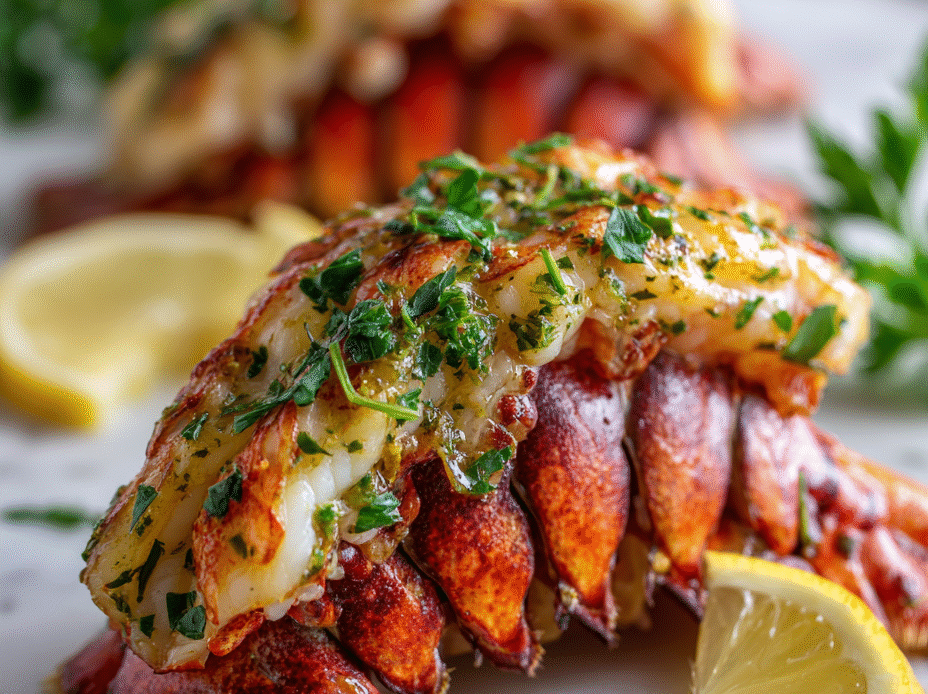
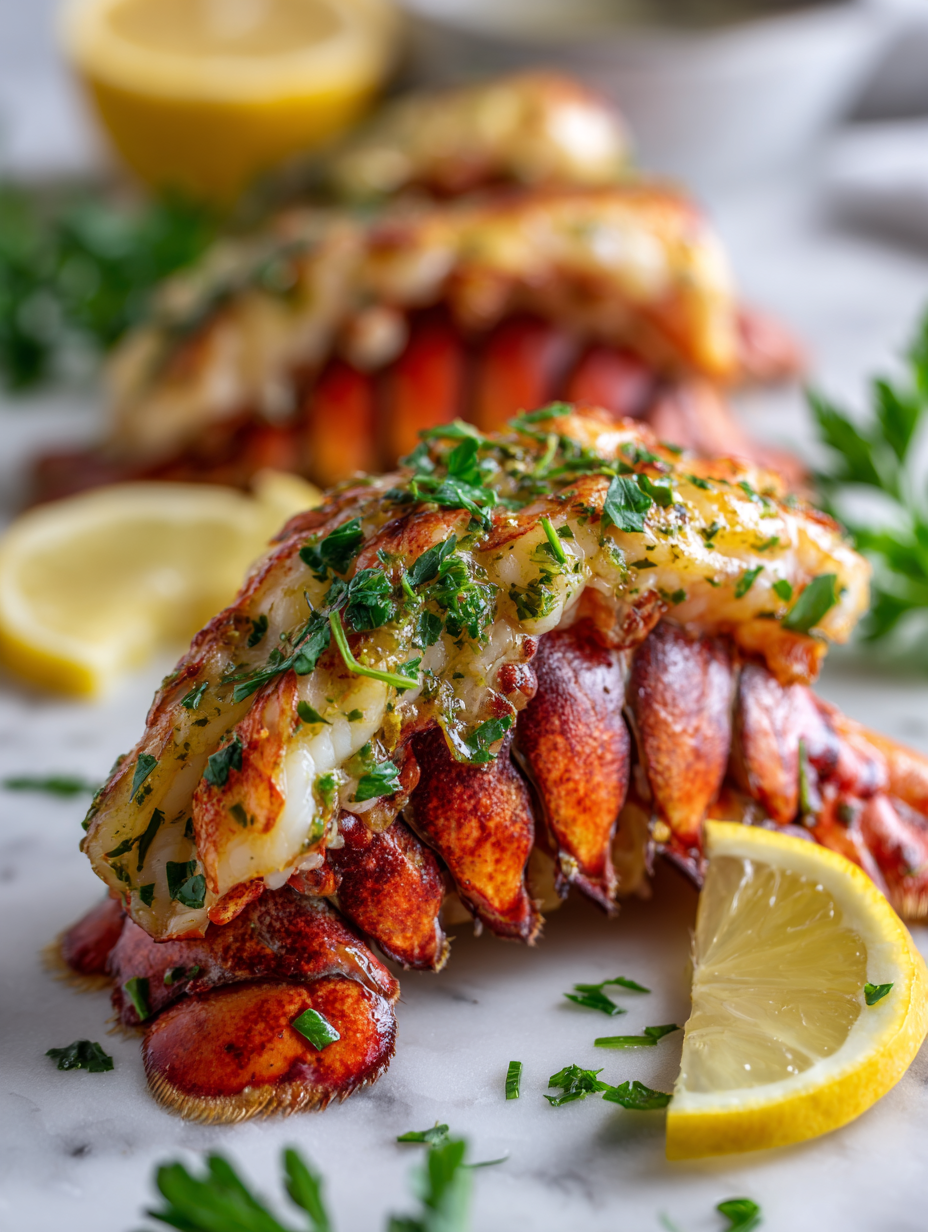
- Bake: Roast in the oven for 12-15 mins. Baste with remaining butter halfway through. The lobster is done when the meat is opaque and slightly firm to the touch, with a fragrant herbal aroma rising.
- Finish and serve: Remove from oven, let rest for 2 minutes. Squeeze lemon over the lobster, then drizzle with a touch of extra garlic herb butter. Plate and garnish with fresh herbs.
Rest the lobster for 2 minutes after baking to let juices redistribute. Finish with a squeeze of lemon and a drizzle of reserved garlic herb butter. Serve directly on the plate, garnished with fresh herbs for visual contrast.
How to Know It’s Done
- Lobster meat is opaque and firm, with a slight bounce when pressed.
- Herbal butter is fragrant, infused with garlic and herbs, not burnt or bitter.
- Lobster shells are evenly pink and slightly charred at edges, indicating proper roasting.
Garlic Herb Lobster Tail
Ingredients
Equipment
Method
- Use sharp scissors or a boning knife to carefully cut along the top shell of each lobster tail from base to tip, stopping just before the tail fin. Gently pry open the shell to expose the meat, keeping the shell intact.
- Melt the butter in a small saucepan over low heat. Add the thinly sliced garlic and cook gently for about 3 minutes until fragrant, ensuring the garlic doesn’t brown.
- Stir in chopped parsley and thyme into the garlic butter, letting the herbs infuse for about 1 minute. Zest the lemon directly into the mixture for a bright aroma.
- Place the lobster meat on the prepared baking sheet, meat side up. Lightly drizzle the shell with olive oil, then generously brush the meat with the garlic herb butter using a basting brush.
- Arrange sprigs of thyme among the lobster tails if desired, and sprinkle a pinch of sea salt flakes over the top for flavor and texture.
- Preheat your oven to 200°C (390°F). Roast the lobster tails on the middle rack for 12-15 minutes, basting once halfway through, until the meat is opaque and slightly charred at the edges.
- Once cooked, remove the lobster from the oven and let it rest for 2 minutes to allow the juices to settle.
- Squeeze fresh lemon juice over the lobster, then drizzle with any remaining garlic herb butter for extra flavor and shine.
- Finish with a sprinkle of sea salt flakes, garnish with additional herbs if desired, and serve immediately to enjoy the fragrant, tender lobster with bright herbal notes.
Pro tips for perfect lobster
- Thin garlic slices release more aroma and crisp up nicely, adding a toasted note.
- Add fresh herbs late in cooking to preserve their vibrant aroma and delicate flavor.
- Loosen the lobster meat slightly before roasting to allow better infusion of buttery herbs.
- Baste the lobster halfway through roasting to keep the meat moist and flavorful.
- Use a quick, high-temperature roast to get a lightly caramelized shell and tender meat.
- Rest the lobster briefly after baking to let juices settle and prevent dryness.
- Finish with a squeeze of lemon to brighten the herbal richness and add a fresh zing.
Common mistakes and how to fix them
- FORGOT to preheat the oven → Always start with a hot oven for even cooking.
- DUMPED too much garlic → Use moderate garlic; too much can overpower the lobster’s delicate flavor.
- OVER-TORCHED the lobster → Roast at a gentle temperature; lobster cooks quickly and can become rubbery.
- MISSED the resting step → Rest lobster 2 minutes after roasting to lock in juices.
Quick fixes and pantry swaps
- When garlic burns, splash with a little water and stir to stop the scorch aroma.
- If lobster is overcooked, quickly dip in cold water for 30 seconds to halt the cooking process.
- Patch a broken lobster shell with toothpicks or kitchen twine, then bake as usual.
- Splash lemon juice on herbs to brighten aroma if they seem dull or faded.
- Shield lobster tails with foil if they start to brown too quickly during roasting.
Prep, store, and reheat tips
- Prep the garlic herb butter up to 2 days in advance; keep refrigerated and bring to room temperature before using for maximum aroma.
- Shell and clean lobster tails a day ahead; store in an airtight container in the fridge for up to 24 hours, keeping the meat moist with a damp paper towel.
- Reheat leftover lobster gently in a covered dish at 150°C (300°F) for 10 minutes, basting with warm garlic herb butter and checking for tenderness and aroma.
- The flavors intensify if the lobster is marinated in the garlic herb butter for a few hours—cover tightly and refrigerate for up to 4 hours before roasting.
FAQs about Garlic Herb Lobster Tail
1. How do I know when the lobster is cooked properly?
You want the lobster meat to be opaque and firm, with a slight bounce, and the shell should be a vibrant pink with a bit of charred edge. The herbal aroma should be fragrant and not burnt, signaling it’s perfectly roasted.
2. What lobster quality should I look for?
Use fresh lobster tails with glossy shells and a heavy feel. The meat should be plump, with a slight jiggle, and the aroma fragrant with garlic and herbs. Timing is key—about 12-15 minutes at 200°C (390°F).
3. How do I get that fragrant garlic-herb aroma?
Slice the garlic thin to release its pungent, toasted aroma, and add herbs just before the lobster finishes cooking to preserve their bright, fragrant oils.
4. What equipment do I need?
Preheat your oven to 200°C (390°F). Use a rimmed baking sheet, and a small saucepan to melt and infuse the butter. Keep a close eye on the garlic so it doesn’t brown too much.
5. What if I overcook or burn the lobster?
If the lobster overcooks and becomes rubbery, dip it briefly in cold water to stop the cooking, and serve immediately. Over-browning can be fixed by tenting with foil to shield the shell.
6. Can I substitute ingredients?
Use unsalted butter, preferably European-style for richness. Fresh herbs like parsley and thyme give a bright flavor, while lemon zest adds a zesty punch. Olive oil adds a subtle smoky note, but keep it light.
7. What should I look for in key ingredients?
The garlic becomes golden and fragrant, releasing toasted notes. The herbs should shimmer in the butter, adding a fresh, bright aroma without overpowering the lobster’s sweetness.
8. What quick fixes should I remember?
Splash with lemon juice for brightness, shield lobster shells with foil if they brown too fast, and patch cracks with toothpicks if shells break. Keep a close watch during roasting.
9. What are some cooking tips?
Thin garlic slices release more aroma and crisp up beautifully. Add fresh herbs late in cooking to preserve their vibrancy. Baste the lobster halfway to keep it moist, and rest briefly after roasting to lock in juices.
10. How can I prepare ahead or store leftovers?
Make the garlic herb butter up to 2 days ahead and refrigerate. Shell and clean lobster the day before. Reheat gently at 150°C (300°F) for 10 minutes, basting with warm butter for best flavor.
This dish is a reminder that simple ingredients, when treated with care, can lead to something truly special. The fragrant garlic and herbs, combined with tender lobster, come together in a way that feels both indulgent and accessible.
No matter how often I make it, I’m struck by how a few thoughtful touches elevate this seafood into a memorable moment. It’s perfect for when you want a little luxury that doesn’t demand fuss or complexity, just honest, well-executed flavors.
Hi, I’m Olivia Chen-Williams, a professional chef, cooking instructor, and the founder of Turn Around At 50. For nearly three decades, my life has revolved around kitchens. Not the quiet, romantic kind, but the real ones. Hot, loud, demanding, and deeply alive.
