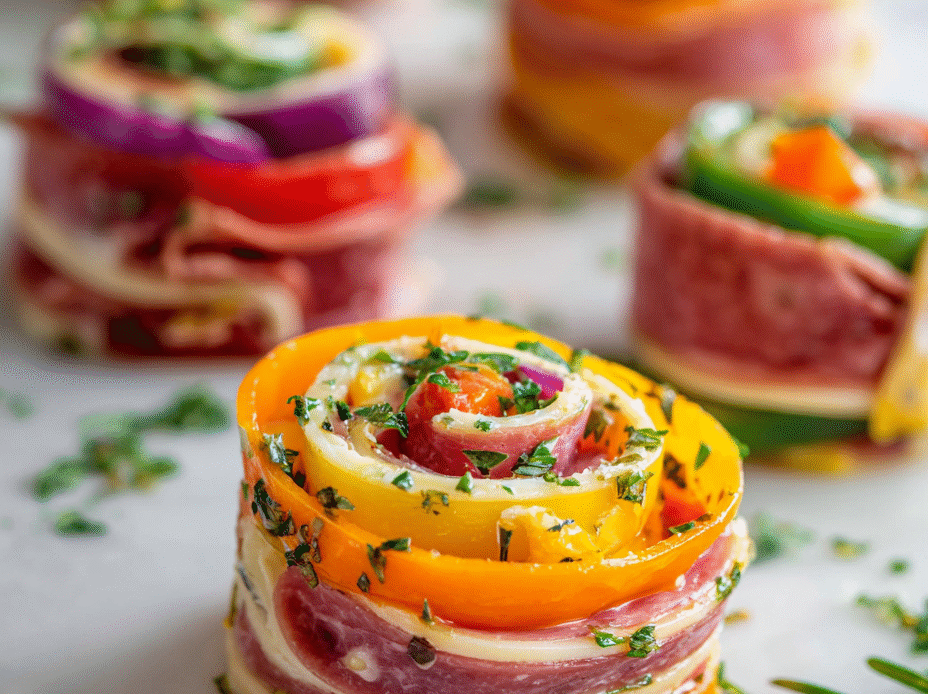
Holiday parties often mean a mountain of snacks and little time to prepare elaborate dishes.
These pinwheel appetizers are a fun, foolproof way to bring color and flavor to the table without fussing over perfect presentation.
They’re a playful twist on traditional finger foods, easy to customize with whatever you have at hand.
Table of Contents
Behind The Recipe
They’re unpredictable in the best way—layered with flavors, colors, and textures. They make every snack feel special, even if I’m just throwing stuff together last minute. Plus, kids love the playful spiral shape, and adults appreciate how easy they are to customize. It’s a simple joy to see a tray disappear quickly, no matter the occasion.
Why You’ll Love This Recipe
- Make-Ahead Friendly: Perfect for planning ahead
- No Cooking Required: Simple assembly
- Festive and Colorful: Looks great on a platter
- Easy to Customize: Endless filling options
- Crowd Friendly: Familiar and approachable
- Neat Finger Food: Easy to grab and eat
- Budget Friendly: Simple ingredients
Chef’s Pro Tips for Perfect Results
- Soften Cream Cheese Fully: Spreads smoothly
- Spread Evenly: Prevents loose rolls
- Roll Tightly: Keeps pinwheels intact
- Chill Before Slicing: Cleaner cuts
- Use a Sharp Knife: Neat presentation
- Texture Accuracy : Pat vegetables dry before adding to filling to prevent soggy pinwheels.
Kitchen Tools You’ll Need
- Mixing Bowl: For the filling
- Spatula: Smooth spreading
- Cutting Board: Rolling and slicing
- Sharp Knife: Clean edges
- Plastic Wrap: Helps with chilling
Ingredients in This Recipe
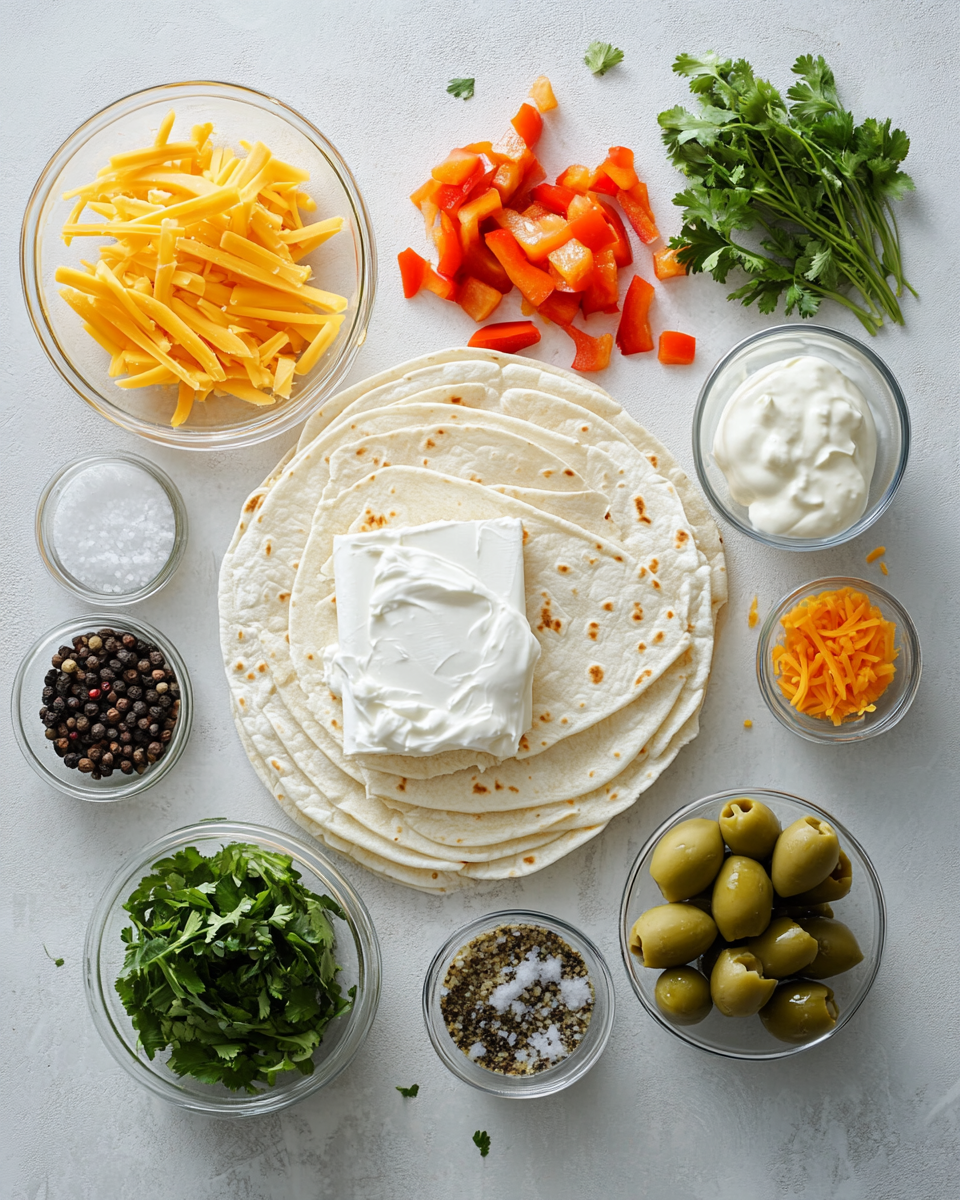
- Flour Tortillas 4 large (20–25 cm): Soft and flexible for rolling
- Cream Cheese 225 g (8 oz), softened: Creamy base that holds everything together
- Sour Cream or Mayonnaise (3 tablespoons): Adds spread ability
- Shredded Cheddar or Colby Jack Cheese 1 cup (100 g): Mild, familiar flavor
- Diced Bell Peppers ½ cup (75 g), finely diced: Color and crunch
- Green Onions ¼ cup (25 g), sliced: Gentle savory bite
- Sliced Olives ¼ cup (optional): Optional salty contrast
- Salt ¼ teaspoon: Enhances flavor
- Black Pepper ¼ teaspoon: Light seasoning
- Fresh Herbs 1–2 tablespoons (optional): Optional brightness
Ingredient Substitutions
- Tortilla Swap: Spinach or tomato wraps
- Cheese Option: Pepper jack or mozzarella
- Dairy-Free Option: Plant-based cream cheese
- Veggie Swap: Shredded carrots or spinach
- Protein Add-In: Diced ham or turkey
Ingredient Spotlight
- Cream Cheese: Cream cheese binds ingredients together and provides creamy texture.
- Bell Peppers: Add festive color and crunch
How To Make This Recipe
- Place softened cream cheese in a mixing bowl.
- Add sour cream or mayonnaise and mix until smooth and spreadable.
- Add shredded cheese, bell peppers, green onions, olives (if using), salt, and black pepper.
- Mix until evenly combined.
- Lay a tortilla flat on a clean surface.
- Spread an even layer of filling across the entire tortilla.
- Roll the tortilla tightly into a log shape.
- Wrap in plastic wrap and refrigerate for at least 30–60 minutes before slicing.
- Remove from refrigerator and slice into 2–3 cm thick pinwheels.
- Arrange on a serving plate and garnish with fresh herbs if desired.
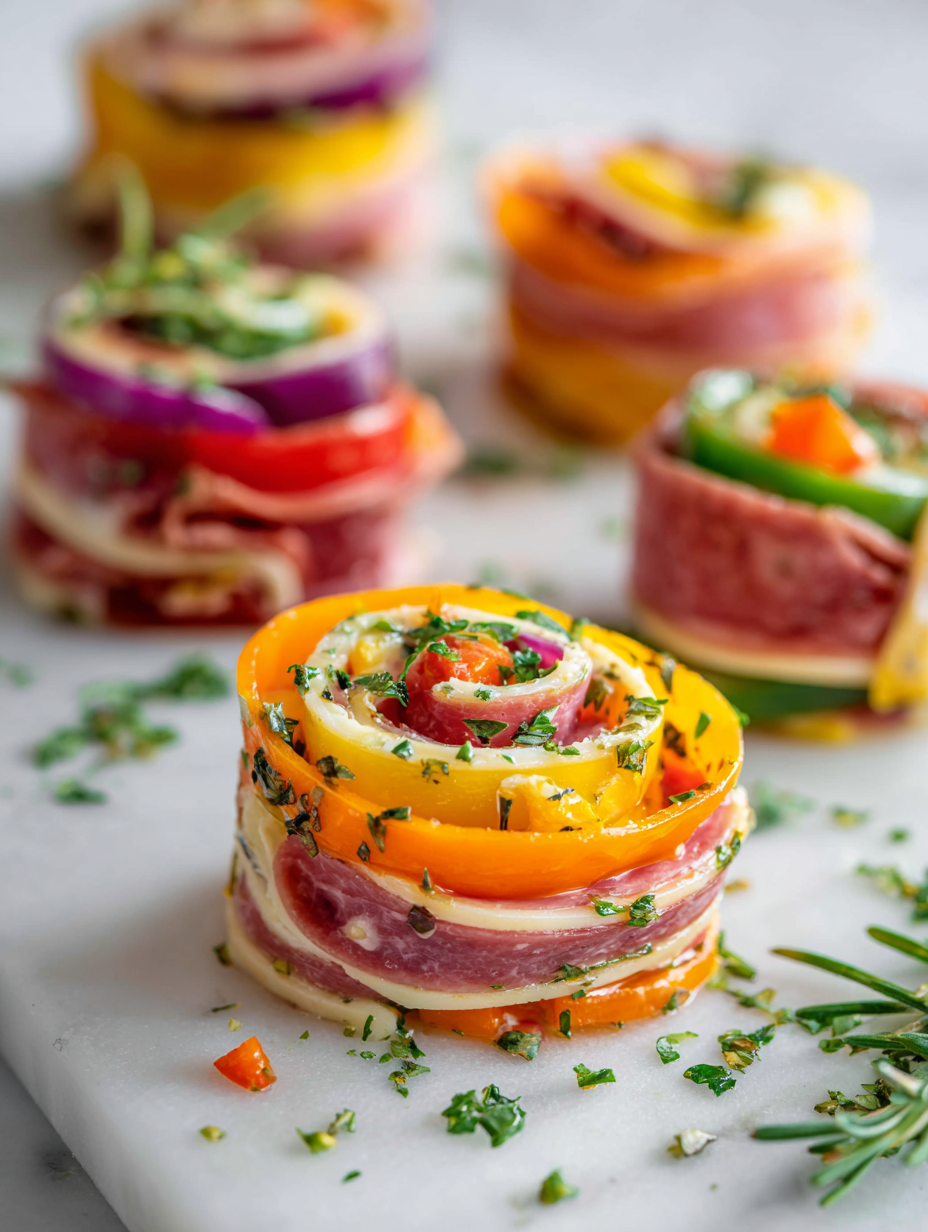
Colorful Pinwheel Appetizers
Ingredients
Equipment
Method
- Place softened cream cheese in a mixing bowl.
- Add sour cream or mayonnaise and mix until smooth and spreadable.
- Add shredded cheese, bell peppers, green onions, olives (if using), salt, and black pepper.
- Mix until evenly combined.
- Lay a tortilla flat on a clean surface.
- Spread an even layer of filling across the entire tortilla.
- Roll the tortilla tightly into a log shape.
- Wrap in plastic wrap and refrigerate for at least 30 minutes.
- Remove from refrigerator and slice into 2–3 cm thick pinwheels.
- Arrange on a serving plate and garnish with fresh herbs if desired.
You Can Also Try Out Other Recipes
Texture & Flavor Secrets
- Creamy filling: Soft cheese creates smooth texture
- Balanced crunch: Vegetables add freshness
- Clean slices: Chilling helps firm the roll
What To Avoid
- Using cold cream cheese: Makes spreading difficult
- Overfilling tortillas: Causes tearing
- Skipping chilling step: Leads to messy slicing
Nutrition Facts (Approximate, Per Serving – 4 pinwheels)
- Calories: 180-220
- Protein: 6 g
- Carbohydrates: 14 g
- Fat: 11-14g
- Sugar: 2 g
Make-Ahead and Storage Tips
- Make Ahead: Assemble up to 24 hours in advance
- Store Wrapped: Prevents drying out
- Slice Later: Keeps rolls fresh
- Refrigerate Leftovers: Up to 3–4 days in airtight container
How to Serve This Dish
- On a Platter: Colorful and inviting
- With Dips: Ranch or salsa
- As Part of a Spread: Pairs well with other finger foods
- Yield Clarification : Makes about 24–30 pinwheels (depending on slice thickness)
Creative Leftover Transformations
- Lunch Wraps: Leave unsliced
- Chopped Salad Add-In: Dice and toss
- Snack Boxes: Easy grab-and-go
- Mini Wrap Halves: Larger portions
Additional Tips
- Add Heat: Jalapeños or hot sauce
- Use Fresh Herbs: Brightens flavor
- Match Colors: Red and green for holidays
Make It a Showstopper
- Arrange by Color: Eye-catching display
- Use Mixed Wraps: Visual variety
- Serve on a White Platter: Colors pop
Variations to Try
- Southwest Pinwheels: Taco seasoning and corn
- Italian Pinwheels: Sun-dried tomatoes and herbs
- Veggie-Only Pinwheels: Extra vegetables
- Ham and Cheese Pinwheels: Classic combo
- Spicy Buffalo Pinwheels: Buffalo sauce and chicken
FAQs
- Can I make these the night before: Yes, they are ideal for making ahead and chilling overnight.
- Do they get soggy: Not if vegetables are dry
- Can I freeze pinwheels: Not recommended because freezing affects texture and makes tortillas soggy.
- Are these kid friendly: Yes mild flavor
- What tortillas work best: Soft flour tortillas
- How thick should I slice: Slice about 1.5–2.5 cm (½ to 1 inch) thick.
- Can I skip olives: Yes optional
- Do they travel well: Yes very
- Can I make them gluten free: Use GF wraps
- How many per person: Three to four

Hi, I’m Olivia Chen-Williams, a professional chef, cooking instructor, and the founder of Turn Around At 50. For nearly three decades, my life has revolved around kitchens. Not the quiet, romantic kind, but the real ones. Hot, loud, demanding, and deeply alive.